
Tiffany technology
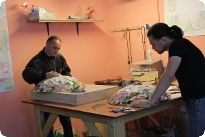
Below is an example of a simple stained glass window
Training in Tiffany and stained glass courses. Contact us:
+38-097-904-09-54 +38-066-766-05-19
1. Sketch of a stained-glass.
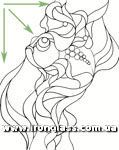 As an example of a stained-glass window we drew a simple stained-glass fish to make it easy for beginners to understand Tiffany's technique
The main postulates of stained glass sketch creation:
- The more cross-like connection lines are in a stained-glass window design,
As an example of a stained-glass window we drew a simple stained-glass fish to make it easy for beginners to understand Tiffany's technique
The main postulates of stained glass sketch creation:
- The more cross-like connection lines are in a stained-glass window design,  the more reliable it is and the more resistant to mechanical influences.
- If you want to make the suture lines wide, then you should avoid narrow long elements with strongly sharp corners, because a wide strip will cover part of the end and top of the detail, also if overheated during the soldering process of this element you can get a crack on it.
The sketch of the stained-glass window is printed or drawn according to the final dimensions that you need. The entire drawing is transferred to the tracing paper, keeping the final size
the more reliable it is and the more resistant to mechanical influences.
- If you want to make the suture lines wide, then you should avoid narrow long elements with strongly sharp corners, because a wide strip will cover part of the end and top of the detail, also if overheated during the soldering process of this element you can get a crack on it.
The sketch of the stained-glass window is printed or drawn according to the final dimensions that you need. The entire drawing is transferred to the tracing paper, keeping the final size 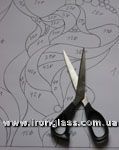 of the stained-glass window.
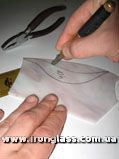
Then each fragment is numbered and the direction of the lines is also indicated according to the sketch (if it is necessary to save the direction of the glass texture), after that it is cut along the contour with a specific stained glass knife or scissors
of the stained-glass window.
Then each fragment is numbered and the direction of the lines is also indicated according to the sketch (if it is necessary to save the direction of the glass texture), after that it is cut along the contour with a specific stained glass knife or scissors 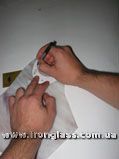 for stained glass templates. These scissors consist of three blades. The middle blade cuts a paper line about 0.127-0.126 cm wide while cutting the sketch. In this way, we get an indent on the strip and a tin suture in the future solder process. All around the perimeter of the tracing beads we attach a staple to ensure that the future stained-glass window has clear borders and retains its size.
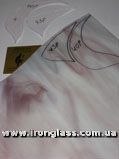
2. Stained glass and its selection.
Stained glass of European, American or Chinese production we use is distinguished by a wide range of shades, colors, texture and thickness. We recommend you take American or German glass. When selecting glass for your stained glass window you need to know where the stained glass window will be, how and what it will be illuminated (lamps, daylight, candle, etc.), how harmoniously the colors and shades will be combined with each other, as well as the texture. We have chosen for our work as a background glass Spectrum baroque. The rest of the glass is also Spectrum baroque, the spectrum of the opal series as well as Wissmach.
3. Cutting stained glass elements.
Glass of different manufacturers has different thickness and texture. The stencil cut out of the project is applied to the glass and circled with a water-resistant thin marker. We will cut the glass along the line. It is necessary to cut glass on a smooth, not on the texture side, not forgetting to turn the stencil inside out in such cases. The glass cutter must be held in the right hand as if you were holding a pencil at an angle of 40° to 45° from the surface of the glass. Do not press hard on the handle of the glass cutter. The pressure should be small. The glass cutter should be kept as even as possible so that the diamond roller stands perpendicular to the glass. If this moment is not observed, chipping on the glass will occur at an arbitrary angle. Glass cutting should be as fast and accurate as possible. At the end of the cutting line, reduce the pressure on the glass cutter, otherwise the chip will come out at the edge of the part. The slot line must be smooth, continuous and not angular. A light tapping with the reverse side of the glass cutter along the cutting line on the back side of the glass leads to a perpendicular increase in cracks and splitting the glass. When a piece of glass is small, it can be done in your hands. But when you need to cut a larger piece - put a sheet of glass on the edge of the working surface of your tabletop, tap glass cutter and split it. If you need to separate a small part of the detail, use stained glass pliers to separate the glass into fragments. When you want to cut a fragment with an internal radius, divide this radius into 3-4 straight lines. The bigger the radius of the part, the more these lines are needed. Lens recesses (glass beads) should be made on the grinder with a stone of the appropriate diameter. For example, as stained glass elements of grapes in a stained glass window with a bird on the home page of our resource.
4. Grinding parts of stained glass.
After cutting glass parts it is necessary to process the ends of each part on the grinder 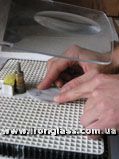 in order to remove unevenness and small chips formed during cutting, as well as to prepare the surface of the end face (make it rough) on the glass for high-quality gluing of the strip.
The working surface of the grinding machine is the diamond-plated head, which is supplied with water during the grinding process, which facilitates the grinding of parts and helps to get rid of the rapid wear of the diamond surface of the head.
Diamond nozzle heads are available in different widths and grain sizes. Fine-grained, with a standard grain and coarse-grained. The coarser the grain, the faster it sharpens the workpiece, but the use of coarse-grained heads can cause chips at the end of the glass, which only hides a wider stripe.
To achieve fine lines on the stained-glass window, use only a fine-grained diamond head. When grinding, check the dimensions of the part against your sketch to avoid inaccuracies.
in order to remove unevenness and small chips formed during cutting, as well as to prepare the surface of the end face (make it rough) on the glass for high-quality gluing of the strip.
The working surface of the grinding machine is the diamond-plated head, which is supplied with water during the grinding process, which facilitates the grinding of parts and helps to get rid of the rapid wear of the diamond surface of the head.
Diamond nozzle heads are available in different widths and grain sizes. Fine-grained, with a standard grain and coarse-grained. The coarser the grain, the faster it sharpens the workpiece, but the use of coarse-grained heads can cause chips at the end of the glass, which only hides a wider stripe.
To achieve fine lines on the stained-glass window, use only a fine-grained diamond head. When grinding, check the dimensions of the part against your sketch to avoid inaccuracies.
5. Wrapping stained glass elements
 of the stained-glass window with copper foil.
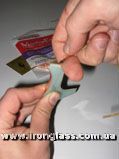
Every detail of the future stained-glass window is wrapped in copper foil tape (folio).The folio is a thin strip of copper foil that is glued to the end of the part as adhesive tape due to the glue initially applied to it. Glue can be transparent or black. If you use transparent glass in combination with black patina, you need to choose a folio with black glue, then the finished stained glass window will not see a folio.
The folio is only glued to dry, clean and ground glass. The folio spins outside the glass
of the stained-glass window with copper foil.
Every detail of the future stained-glass window is wrapped in copper foil tape (folio).The folio is a thin strip of copper foil that is glued to the end of the part as adhesive tape due to the glue initially applied to it. Glue can be transparent or black. If you use transparent glass in combination with black patina, you need to choose a folio with black glue, then the finished stained glass window will not see a folio.
The folio is only glued to dry, clean and ground glass. The folio spins outside the glass 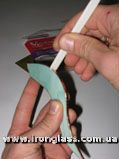 should be the same. Otherwise, they're cut off with a paper knife (undesirable). This determines the smoothness of the stained-glass window lines, as well as its reliability.
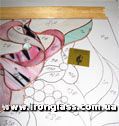
Iron the surface of the parts with a special stack or plastic marker when the winding is finished. The stained-glass window elements should be with a little indent. Wrapped parts are placed in their places on a tracing roll, observing their serial numbers. We begin to lay out the details from the corner, as shown by the arrows
should be the same. Otherwise, they're cut off with a paper knife (undesirable). This determines the smoothness of the stained-glass window lines, as well as its reliability.
Iron the surface of the parts with a special stack or plastic marker when the winding is finished. The stained-glass window elements should be with a little indent. Wrapped parts are placed in their places on a tracing roll, observing their serial numbers. We begin to lay out the details from the corner, as shown by the arrows 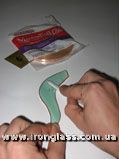 in the photo. It is important that there is a ~1mm gap between the parts, but no more. This will allow the tin to connect the parts well with each other and avoid thick lines. All seams are covered with solder acid-flux with a brush. Acid removes the oxide from the folio, so you can lay the tin well during the soldering process.
6. Soldering stained glass
When soldering stained-glass windows "Tiffany" one should take tin solder brand POS-61. The end of the tin wire is placed on the stained-glass window seam and melted with a stained-glass soldering iron. Hold the soldering iron like a pen. Thus, the stained iron should be pulled along the soldering seam.
Do not hold the soldering iron for long in one place - it may break the glass or 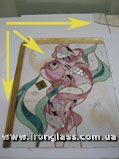 burn out the glue of the foliage, and do not touch the open areas of the glass with the soldering iron.
Walk through all the joints with a thin layer of tin, pouring it in between the parts before soldering.
The perimeter of the stained-glass window should be framed in a brass P-like
burn out the glue of the foliage, and do not touch the open areas of the glass with the soldering iron.
Walk through all the joints with a thin layer of tin, pouring it in between the parts before soldering.
The perimeter of the stained-glass window should be framed in a brass P-like 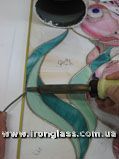 profile frame to create additional T-shaped connections and stained-glass window strength, as well as convenient further installation. Keep in mind that in the places where the profile is put on, soldering should be flat, and when the profile is put on, it should be soldered to the main seams.
As the stained-glass window will be inserted into the brass profile frame all around the perimeter, the joints should be soldered at the edges of the perimeter without reaching about 5 mm to the edge. When the parts of the stained-glass window are soldered among themselves, as well as from the back side, a frame is ordered.
profile frame to create additional T-shaped connections and stained-glass window strength, as well as convenient further installation. Keep in mind that in the places where the profile is put on, soldering should be flat, and when the profile is put on, it should be soldered to the main seams.
As the stained-glass window will be inserted into the brass profile frame all around the perimeter, the joints should be soldered at the edges of the perimeter without reaching about 5 mm to the edge. When the parts of the stained-glass window are soldered among themselves, as well as from the back side, a frame is ordered.
7. Applying real liquid patina.
After soldering, the stained-glass window is treated with 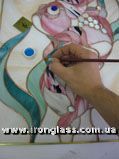 special liquids to neutralize acid-flux, thoroughly washed with water and detergent, polished with a cloth, and then patina is applied. Patina is applied with a brush on the tin joints of the stained-glass window until the necessary effect (copper, bronze or black) is achieved. Patina can be copper, black and antique bronze. Note that rubber gloves should be worn to prevent irritation of the hands.
After rubbing the patina, the stained-glass window should be kept for about 15 minutes, then thoroughly washed and treated with
special liquids to neutralize acid-flux, thoroughly washed with water and detergent, polished with a cloth, and then patina is applied. Patina is applied with a brush on the tin joints of the stained-glass window until the necessary effect (copper, bronze or black) is achieved. Patina can be copper, black and antique bronze. Note that rubber gloves should be worn to prevent irritation of the hands.
After rubbing the patina, the stained-glass window should be kept for about 15 minutes, then thoroughly washed and treated with  antioxidant to prevent oxidation of the seams. Then let it dry and polish it with a soft cloth.
Everything's ready - put it in the frame!
If you still want to be trained by stained glass Tiffany masters, then go ahead
antioxidant to prevent oxidation of the seams. Then let it dry and polish it with a soft cloth.
Everything's ready - put it in the frame!
If you still want to be trained by stained glass Tiffany masters, then go ahead
